Appearance
Exercise 1 - Unify Data with Data Streams
The goal of this exercise is to learn how to use Data Streams to ingest data from multiple sources into Data Cloud and how those sources map into the Customer 360 model.
Different systems will have different data models. Welo, as a tech company, has Account and Contact data in Sales Cloud and product usage datasets in AWS S3. For this workshop we’re using S3 but most customers keep their usage data in cloud data warehouses like Snowflake, BigQuery, Databricks or Redshift, which Data Cloud accesses via our zero-copy partnerships.
Each system has different columns representing people and information related to people. For instance, the Welo Platform Users dataset contains an Account key but this refers to the way that Welo’s product understands an Account, not an account as it exists in Salesforce CRM.
Data Cloud abstracts this complexity by mapping each source system to a canonical model. This canonical model is called the Customer 360 Data Model and has many out-of-the-box tables based on industry best practices to meet many use cases. This schema is also normalized. An example is how Data Cloud has the concept of an Individual. User data from S3 and contact data from Sales Cloud are both mapped to the Individual object. If you’re coming from a Salesforce background, you’ll notice that the party data model has separate tables for things like Phone Numbers, Addresses and Emails.
Why Do I Need to Map Data Streams?
Every company has a different product architecture and stores usage data in a different way. That’s why you need to map your data sources to the canonical data model in Data Cloud.
To streamline today’s workshop, much of the data has already been ingested into Data Cloud. To give you a feel for the ease of ingesting data into Data Cloud, we’ll ingest Welo Platform Login information from S3. The point of this is to allow their Sales, Marketing, Success, and other customer-facing teams to have a unified view at the Account level and individual User level. This then enables every GTM team to have more personalized, 1:1 interactions with customers and users, resulting in greater customer retention, expansion and loyalty opportunities.
Step 1: Reviewing Data Streams and the Customer 360 Data Model
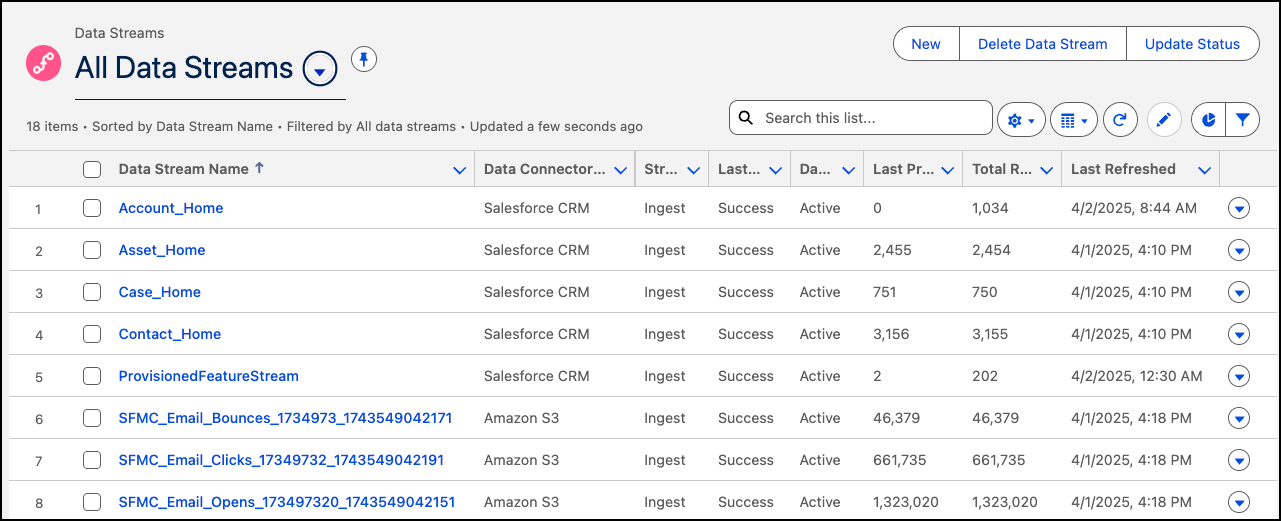
From the Data Cloud Home Page, navigate to the Data Streams tab. If you see Recently Viewed at the top, switch the view to All Data Streams.
From here, we can see information about the data being ingested into Data Cloud, where it’s coming from, the Total Records in the stream, and so on. This is really the first step in the ‘data journey.’ Let’s take a look at what’s already set-up for Welo.
From CRM, data streams have been set up for the Account, Asset, Case and Contact objects.
From the Welo platform (by way of Amazon s3), data streams have been set up for both Accounts and Users.
From Salesforce Marketing Cloud, data streams have been set up for email profile and engagement data like Subscribers, Sends, Opens, Clicks and Bounces.
And from Welo’s website, data streams have been set up for Visitors and Page Views.
Next, navigate to the Data Model tab. By default, this tab lists the Mapped Data Model Objects (DMOs).

Let’s look at the “Big Picture” first. In the Upper Right, change from List view to Graph view.

This shows a data model visualization, including relationships between objects.

Observe the distinct colors for the Profile, Engagement and Other categories.
Choose Profile if your dataset aligns with:
A list of consumers with identifiers like consumer IDs, email addresses, or phone numbers
A list of businesses or accounts with account IDs
A list of employees or any other population for segmentation or as a segment’s starting population Opt for the Engagement category if your dataset is time-series oriented, such as Web Engagement, Email Engagement, or Orders. If your dataset is related to Profile and Engagement but doesn’t fit those categories, like product, store or vehicle info, go for the Other category.
In the Upper Right, search for Account.

This will show two key objects in the data model: Account and Unified Account. Looking at the graph, the Account is the core of the data model, with data from all sources related to an Account. Unified Account represents a single Welo Account unified across all sources. Remember, this data model is meant as a jump start and is completely flexible and extendable. We’ll dive deeper into this in the remainder of the session.
You may want to leave the Data Model graph open to refer back to throughout the workshop.
Step 2: Ingest Logins from Cloud Storage
- Open the Data Streams tab in a new browser tab.
- Click New on the upper right. This New Data Stream wizard lists many different sources and this isn’t all of them, just a small number enabled in this workshop environment.
- Select Amazon S3 as the source and click Next.

- In the next step, leave the file type as CSV, and type Platform in the Import from Directory field, Logins.csv.gz in the File Name field and Welo in the Source field.

- Click Next.
- In the next panel, specify the Category as Engagement. With Engagement data, we need an Event Time Field **** indicating the timing of the engagement in addition to a Primary Key. Select an Event Time Field of Login Timestamp and a Primary Key of LoginReferenceId.
- Rename the Data Lake Object Label to Welo Platform Logins.

- Click Next.
- In the last dialog, leave the Data Space as default and click Deploy.
What is a Data Space? A data space in Data Cloud organizes data for unification, insights, and marketing. Categorize by brand, region, or department so users see only relevant data. This is of particular importance for companies with separate business units or brands.
Once deployed, you’ll see an overview of your new Data Stream. Notice that no fields are mapped under Data Mapping. Let’s fix that.

Click the Start button in the Data Mapping box.
The Source is on the left in a Data Stream mapping. In our case, this represents the fields in the Contact object from Sales Cloud.
The Destination is on the right. We must select how to add this data to our data model. Click Select Objects.
In our instance we’re going to create a custom object to house our sales call information and then add a relationship to the account. Navigate to the Custom Data Model tab and click New Custom Object.

Rename the object Welo Platform Logins and click Save.

We’ve now created a custom data model object and mapping to fit our data. But we still need to connect it to the rest of the dataset. To add our relationship, click the chain link icon next to Sales Call on the right.

Click New and then click New Relationship on the dialog that appears. Which should leave you with a screen like this:

On the left hand side we need to select the field from the Login that relates to our other datasets. Under Field, choose Account from the drop-down. Under Cardinality, select N:1 since an account can have many logins. Under Related Object choose Account and under Related Field choose Account Id.

Add another New Relationship to join Logins to the Individual DMO. Click New Relationship and select User from the Field dropdown. Next, choose Cardinality of N:1 and the Related Object of Individual. Last, set the Related Field to Individual Id.

Click Save & Close to exit the Edit Relationships window.
Click Save & Close again on the mapping screen to complete your first mapping.
From the Data Stream detail page, click Refresh Now to execute the stream and ingest the login data into Data Cloud. Before we move on, it’s important that we reflect on the reason for using data streams.
Faster Data Access: For Welo, the process of bringing in different sets of data from different sources has been drastically simplified by Data Cloud. Up to this point, this process required multiple engineering teams and significant amounts of time.
GTM Autonomy: Sales, Marketing and Success teams are able to access data from Welo’s data warehouse, driving more value from the data team’s existing work.
Step 3: Unify Accounts & Profiles with Identity Resolution
Once data has been ingested into the Data Cloud, we need to unify the data. In this process we’ll see how Welo can unify Individual Profiles and Accounts. Why?
- Individuals: Welo has Users in their Product who may or may not exist as Contacts in Sales Cloud. Now sales and success users can identify product users to drive expansion opportunities as part of a product-led sales playbook.
- Accounts: Welo also has Account duplication, which has negative, downstream impacts to their GTM teams. With Account Unification, Welo’s sales teams will have better insights into overall account health and revenue opportunities while collaborating with marketing on ABM.
What’s the point of a unified identity?
A customer can be a CRM contact, a product user, or a contact from a data enrichment provider. Data also isn’t exact. Fuzzy matching lets you create a single profile for your customer.
In this step, we review the configuration since the unification was executed before the workshop.
While still in Data Cloud, click the Identity Resolutions tab. You may need to change the List View filter to All Identity Resolutions.
Like the Data Streams tab, this shows a list of Ruleset Names along with their attributes and results, including the number and percentage of matching records.Click the ruleset Unified Individual to see more details. This represents how our Salesforce Contacts, Welo Platform Users, SFMC Subscribers and Website Page Visit get connected.

Under the Ruleset Properties tab, review the two primary parts of the ruleset:
Match Rules: These define the attributes used to identify matching records. In this example, we use a fuzzy match for the Name and a normalized match for the email.
Reconciliation Rules: Matched data sources may provide different values for a single field. Reconciliation rules specify the best value to save to the unified profile. Options include Most Frequent or Source Priority.
Step 4: Use Reports to Verify Unified Accounts
Reports & Data Cloud In this workshop we’re using reports to see how unification works. But all data in Data Cloud can be reported on with standard reports & dashboards or Tableau, letting your GTM teams get insights & trends from your product usage & intent data.
While still in Data Cloud, click the Reports tab. It may be under the More tab, depending on your screen resolution.
Navigate to the All Folders section on the sidebar.
Click the Identity Resolution folder.
Next, click into the Account Unification report. Here we can see how different sources of account data (Welo’s Salesforce instance and Welo’s own internal platform) come together.

Use the Back button on your browser to return to the Identity Resolution folder.
Click into the Individual Unification report. Here we can see how individuals may be contacts in Welo’s Salesforce instance, users on Welo’s platform, subscribers from Welo’s Marketing Cloud or web visitors on Welo’s site. Sometimes an individual will be recognised multiple times from a single source.
 This concludes Exercise 1.